Hello everyone
Today, I am going to show you how to make this lovely warm scarf
To make the scarf you will need 4 balls of Barisienne 12
I have chosen the colour Ming
But there's nothing to stop you using another colour
You will also need a pair of 15 millimetre needles,
a wool needle
some scissors
and a tape measure
First of all, find the beginning of the ball
I recommend taking the end from the inside of the ball so that the yarn doesn't tangle
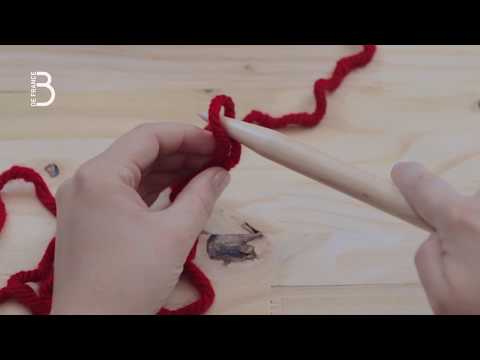
Before casting on the first stitch you must leave a metre of yarn loose
Make your knot
To help your right hand, wrap the yarn around your middle finger and your index finger of your left hand,
to create a loop
Put the left strand under the loop,
then pull it through using your right needle
Gently pull on the 2 strands of yarn to adjust the loop on your needle
This is your first stitch
Put your needle into your right hand
Wind the free end of the yarn around your left thumb,
Put the tip of your needle under the first strand of yarn on your thumb
Using your index finger on the right hand, pass the yarn from the ball over the tip of the needle
Put the loop on your thumb over the tip of your needle and remove your thumb
You have built your second stitch
Gently pull on the yarn using your left hand, use your right hand to steady the stitch
Adjust the stitch so that it sits neatly on your needle
Keep working all of the stitches in the same way for an even cast on
Be careful not to make your stitches too tight,
they must slide easily on your needle
Keep repeating these steps until you have 20 stitches
you can continue to work in Garter Stitch, to make your scarf
Here you can see what Garter Stitch looks like
It is a very easy stitch made using only knit stitches.
Put the needle containing the stitches into your left hand
and hold the empty needle in your right hand
Put the right-hand needle into the first stitch on the left-hand needle
passing under the left-hand needle
The yarn should be at the back of the work
Wind the yarn around the needle passing under then over the tip of the needle
Hold the yarn in place with your right hand next to the right-hand needle
Gentle slide your right-hand needle out of the stitch to bring the loop that you made through to the front
Slip the stitch on the left-hand needle off the tip of the needle keeping the new stitch on your right-hand needle
Voila, you have made your first knit stitch!
To continue in Garter Stitch repeat these steps on every stitch
Wind the yarn around your ring
and little fingers to keep the tension of the yarn correct
and help you obtain an even knit
After you have completed the row all your stitches will be on the right-hand needle
To start the next row swap over the needles in your hands
Then continue to work all the stitches as knit stitches
Change the ball of yarn when you have 160 cm of yarn remaining
Starting a new ball is very easy
Leave the end of your last ball of yarn hanging
Find the beginning of your new ball
from the inside of the ball leaving 20 cm of yarn before you start the first stitch
Hold the wool with your right thumb against the right-hand needle
Then work the next knit stitch with the new yarn
You repeat this process with all 4 balls
You should have 2 metres of yarn remaining at the end of the last ball
I will now show you how to cast off
To cast off stitches you work the first 2 stitches in the usual way
Then, using your left-hand needle take the first
stitch over the top of the second stitch on the needle and let it drop
you now only have 1 stitch on the needle
Work the 3rd stitch as normal,
then pass the other stitch on your right-hand needle over the top again
carry on like this until there is only one stitch remaining on the right-hand needle and none on the left-hand needle
Thread your remaining yarn through the last loop
and gently tighten to create a knot
Your work will now not be able to unravel
You now need to darn in the ends of your yarn
For this you will need a wool needle
Using your wool needle,
thread the yarn along the stitches at the back of the work,
this will make sure that it doesn't unravel
And voila, your scarf is finished !
Please share this video
and your thoughts on the scarf if you would like to !


Không có nhận xét nào:
Đăng nhận xét