In this video, I will show you how to make the the Japanese Cheesecake into 6 simple steps.
By the end of the video, you will be able to make this cheesecake that is
pillowy soft, with cottony texture
and soufflé like crumbs. And let's start right in
When Japanese cheesecake is fresh from the oven,
the cake is so soft that it jiggles like soufflé.
That's why, this is called soufflé cheesecake in Japan.
Let's kicks thing off with step one.
Take the cream cheese from the fridge and leave it at room temperature for at least half an hour
to let it soften. Cream cheese should be spreadable form so that it is easy to beat.
You need to beat the cheese, sugar, and butter until no noticeable lumps.
The texture will resemble to thick cream, and it takes an average three to four minutes.
As of the sugar, castor sugar is the best. Granulated sugar is also suitable.
Step 2- Crack 3 eggs Crack three eggs carefully so that the egg yolks are intact.
Place three yolks and 1 1/2 whites in one bowl, and the remaining whites in another.
Add the cornflour to the eggs and
continue beating it with the mixer until homogenous, light and fluffy.
Whilst the the eggs will add flavor, the corn flour give the cheesecake the texture..
Without cornflour, the cake will most likely just
crumbling down once you taking it out from the cake pan.
Pour the cornstarch into the mixer. Once you have done that,
pour them into the mixing bowl and continue beating it.
Step 3- Incorporate the heavy cream and lemon juice
Beat the heavy cream in a stainless steel bowl with a handheld mixer, until it forms soft peaks
when you lift up the whisk from the batter.
By then, the heavy cream should have trapped more air in its structure, which helps to form the light
and fluffy texture of the cake.
Squeeze some lemon juice and add to the cheese mixture along with the heavy cream.
Scrape the sides of the bowl with a soft spatula at least once, as the beater
can not reach all parts of the mixing bowl. Mixing process is important,
it will trap more air into the batter, which create volume of the cheesecake.
Step 4- Making the meringue As I said earlier, this is the unique step for Japanese cheesecake.
We are making meringue, so be sure the bowl is free from oil.
To begin with, beat the bowl of egg whites until it looks like
the foam of a glass of beer. Then add all the sugar into it and keep beating.
I normally use stainless steel bowl for this purpose as it is easy to keep clean.
Placing the bowl of egg whites on a hot water bath can speed up the formation of meringue.
Beat the egg whites at medium speed until it forms soft peaks.
It fact, it is easier to combine the meringue with soft peaks into the batter,
rather than stiff meringue. In contrast, it is far more difficult to fold in the
meringue with stiff peaks, as there will be small specks of egg whites
remain in the batter. When this happen, you will tend to fold it longer and
hope that it will become smoother, and this will deflate the volume, which result in a denser cheesecake.
That is not you and me want for a soufflés like cheesecake.
Bonus step- Preparing the base of the cheesecake
This is optional. Most of the soufflé-like cheesecake in Japan do not have a
biscuit base like those conventional cheesecake. But since I like to have a base, I will make one,
I simply place the digestive biscuits and crush it, then mix well with melted butter.
To form the crust base of the cheesecake, pour the biscuit/butter mixture to
the cake pan. Spread it out evenly and compress it to a solid flat layer.
It is important to make sure the layer of the biscuit is well-compressed.
The crust will fall apart if it is not sufficiently compressed,
I use a rubber mallet with a flat surface to compress it, and it works very well.
I normally prepare the base earlier and leave it in the refrigerator.
refrigerator and the button will solidly fly so that the base will become firmer
The butter will solidify so the base will become firmer and easier to handle.
Bake the cheesecake in a hot water bath to prevent the cake pan from overheating,
which may result overbaked the sides of the cheesecake.
Bake at 160°C/320°F for 30 minutes, and then 150°C/300°F for 60 minutes
The initial highs temperature will cause rapid raising of the cake in the oven, which helps to form a light and soft texture.
The lower temperature for the second part of baking is to avoid cracking of the surface.
Step 6- Serving and storage.
After baking, remove the cheesecake from the oven and leave it at room temperature to let it cool.
I prefer to remove the cheesecake from the water bath
as soon as I take it out from the oven
This step is to prevent the water seeps into the cake if you are using the springboard or detachable bottom cake pan.
Let the cheesecake cool down at room temperature for about thirty minutes before removing it from the cake pan.
If you remove it too soon, the cheese in the cheesecake is not fully solidified
yet at this point of time and you may
end up with a cheesecake with cracked top and crumbly sides.
I prefer to use a cake pan with the detachable bottom, because it is very easy to remove it.
Simple place the cake on a round can and loosen the cake pan from the detachable bottom by
putting it downwards
Leave it to cool before keeping it in the refrigerator.
This soufflé like Japanese cheesecake is best to serve when it is chilled!
Keep it in the refrigerator for three to four hours before serving it.
The cheesecake is set by now and can be cut easily into wedges.
It's now your turn to make your version of Japanese cheesecake.
Let me know why do you like this cheesecake the most? The texture? Or the flavor?
Leave your answer in the comment section and I will be happy to know.
Click the subscribe button below and share it your friends on social media.
I am KP Kwan. See you next time.

 For more infomation >> 2 adults die in KCK house fire - Duration: 0:45.


 For more infomation >> JPS commission holds listening tour - Duration: 1:02.

 For more infomation >> Premios Alfombra Roja 2017 - Mc Manny - Duration: 1:31.


 For more infomation >> High cholesterol levels | Set high cholesterol naturally - Duration: 5:48.
  For more infomation >> Better Late Than Never - Did Julie Andrews Get This Dizzy? (Episode Highlight) - Duration: 1:50.
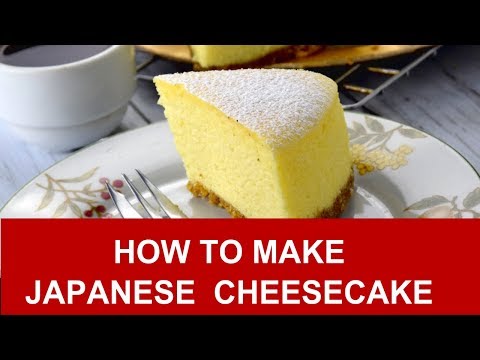
Không có nhận xét nào:
Đăng nhận xét