- Millions of peaches.
I'm in Atlantis, George, home of..
George.
Let's go see if we can get some bad bumps from Usher,
and have a good time.
(upbeat hip-hop music)
(explosion)
Ew, are you joking my ass?
Use a spoon ya nasty girl, you never had soup before?
Look at this nasty bad frog.
What might you- what did you- what would you-
what did you not eat enough flies today?
(rattles) Oh shit.
Get out of my dreams and into my ass,
I'm at the Cacahuela Museum.
My mom wouldn't let me have Cacahuela,
'cause it makes me off the wall.
(high-energy electronic music)
Punch my son's teacher in the throat, there it is.
The birthplace of Martian Luther King.
Founder of Martian Luther King day.
No school, honey.
Holy snopes,
it's Marcuela Benezuti Stadium,
home of the Atlanta Flaccons.
They say the Flaccons were up by 100 points
in the Super Bowl, and still lost.
Toly Crobus, look at this tunnel of freaky fun.
Come come, chep chep.
They got ghosts!
They got Nick Cannon!
They got gas!
They got boobies!
They got peepees!
They got poopies!
They got boobies and peepees together!
They got danosaurs!
They got activism!
They got Dan Trump!
Hi, honey!
Yep, they pretty much had it all.
You know, something me and Atlangela have in common is
we both have pretty big cocks.
(laughs)
No, I don't though.
Hi, honey.
Aren't you glad Michael Vick's out of town?
Now I'm in the middle of the woods,
and I found something called Doll's Head Trail.
Okay, let's get this over with.
Hi, I'm all set, sorry.
Mmm, I'm all set, thank you.
Oh, I'm good, thank you, though.
No, thank you very much.
Oh, thank you so much, but no.
Oh, that's so nice of you, but I gotta go.
Beware of the Thing.
I'm just gonna go, sorry, thank you.
Ass full of raisins,
what a day I've had here in Atlambala, Georgina.
I never did get any bad bumps from Usher but,
I got plenty of mosquito bites in the woods.
It even was the best day of my whole life.
(high-energy electronic music)
For more infomation >> Overly Excited Tourist Has A Sugar High In Atlanta - Duration: 2:32.-------------------------------------------
Why 'Happiness' is a useless word – and an alternative - Duration: 3:28.
-------------------------------------------
Fashion Of These Most Popular Bollywood Actresses Went Wrong | Unbelievable!! - Duration: 2:38.
Fashion Of These Most Popular Bollywood Actresses Went Wrong | Unbelievable!!
-------------------------------------------
Learn Colors With Fruits & Vegetables Finger Family Song Nursery Rhymes Video for Kids - Duration: 5:15.
-------------------------------------------
The Seven Deadly Sins of Social Media - Duration: 5:07.
SunnyLenarduzzi: Happy Halloween (singing).
The dark side of branding, business and being your own boss.
Welcome to the dark side, boss.
There are certain things about social media that kill me.
Literally, I'm dead.
You've killed me.
So, I need to address them, and until I confess these sins on everyone's behalf, I'm not going
to be able to come back to life.
I need you to comment with all of your social media sins, and what you think the biggest
crimes are, when it comes to being online.
These are the seven deadly sins of social media.
Sin number one: lust.
The thirst is real, and if you're only posting for likes, you are bound to get caught up
in constantly trying to get more and more double taps on your content.
But here's the thing: the only way to actually get engagement online is to engage back and
to create a community by posting quality content that either entertains, educates or inspires.
So, instead of lusting for likes, focus on creating content that is actually going to
be beneficial to your audience, because if you are just doing it for the likes, you are
only posting for external gratification, and that, perhaps, is the biggest sin of all.
Sin number two is gluttony.
To avoid being a social media glutton, there are two things to remember.
One: don't over post.
If you are just posting to post, without an actual purpose, you will murder your account's
engagement, and the final step of this is: don't just jump on hashtags or trending topics,
if you haven't done your research.
This has slayed more brands than I can even mention here.
Part two of not being a social media glutton is: don't over consume.
Now, I feel like this goes without saying, but ... Sorry, one second.
That's a nice comment.
So cute!
What was I saying?
Oh yeah.
Don't over consume.
It kills your personality, and it kills your productivity.
Just one second.
Sin number three: greed.
Make it rain!
When did we all become so obsessed with money?
What I would like to say about this, is if you are only using social media to sell, and
to flaunt the cash that you're making, you are kinda missing the point of social media.
Sin number four: sloth.
If you are going to be on social media, be on social media.
The biggest sin, and the fastest way for your audience to ghost you, is if you stop responding
to their comments, and if you are inconsistent in posting.
It breaks all trust with your community, and why would we want to show up for somebody
who isn't showing up for us?
Sin number five: wrath.
Trolls, I'm talking to you.
What I need to say to you, is if you are on social media, to be an asshole, you might
not want to be on it.
That is not the purpose of social media.
It's built for healthy discussion, healthy debates, and helpful information.
Okay?
Okay.
Sin number six: envy.
So, if you are sitting there watching other people and being on your phone, and envying
or being jealous of someone else's success, I challenge you to stop scrolling and start
creating your own.
Sin number seven: pride.
If you are taking a holier-than-thou approach to social media and think you can become an
overnight expert, nobody in the world who is the best at what they do became an expert
overnight.
So, invest in education.
Invest in resources.
Invest in mentors, and be honest and authentic about where you really are in your experience,
because if you are building your brand or your business on a pedestal of pride, it is
built to break.
Okay boss, I am running out of time.
I've given you so much time to confess your sins.
Have you confessed your sins?
Have you?
Have you?
Have you?
Oh!
You've brought me back to life.
If you liked this video, make sure you hit that "like" button below.
Share it with your friends in honor of Halloween, and comment below and confess your social
media sin.
Thanks for watching, I mean, thanks for watching, and a huge thank you to Lakeisha who did my
makeup today.
I'm not really dead, guys.
Don't worry.
Where can people subscribe to your channel?
Lakeisha: You can subscribe to me on YouTube.
My username is LKMCNEILL, so L-K-M-C-N-E-I-L-L.
SunnyLenarduzzi: And we will link to it below.
She is a brilliant makeup artist.
Thank you.
Lakeisha: No worries.
SunnyLenarduzzi: For the dark side of branding business and
being your own boss.
Make it rain!
-------------------------------------------
Cold front could bring rain, wind this weekend - Duration: 3:11.
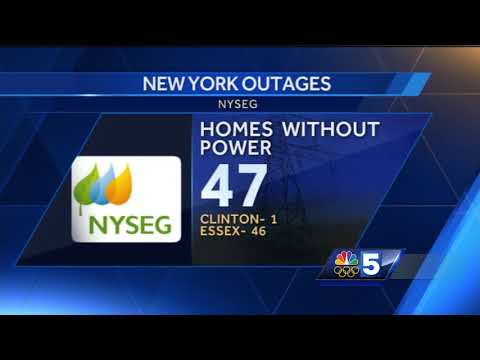
-------------------------------------------
Jeep Wrangler MBRP Installer Series Cat Back Exhaust (2007-2011 JK 4 Door) Sound Clip & Install - Duration: 6:59.
This MBRP installer series cat back exhausted system with the muffler relocation is for
those of you that have a 4-door, 2007 to 2011 JK that are looking for an exhaust system
that's going to give you a louder exhaust node, a lower exhaust tone, and also going
to relocate that muffler to an area where it's not going to get banged up on the trail
quite as much as it otherwise would.
This system, as with most other aftermarket exhaust for your JK is going to be a very
easy system to install.
Definitely a one out of three wrench installation here.
Shouldn't take you more than two hours to get installed.
Probably less than that, but we'll talk a little bit more about that in just a second.
So everything is gonna be nice and tucked up out of the way, again, for those of you
that are doing a little bit more rock crawling and off-roading.
Now if you're looking for the highest tuck system with the least amount of piping, there
are some other options out there that are going to dump right after the muffler in the
same position that this is, instead of having this larger over axle pipe that still exits
to the back.
Those systems are in general going to be a bit louder because they don't have quite as
much piping.
If you want something louder, if you want something that's a higher tuck, those options
are available.
But this is still going to be a pretty aggressive system that's gonna be great for those of
you that are gonna be going off-road.
Our MBRP is able to keep the cost of this system down a little bit because this is going
to be built of aluminized steel instead of stainless steel.
Now stainless steel's gonna get holed up even better than the aluminized will to rusting
conditions.
There are a couple of different grades of stainless that are going to be of varying
qualities and varying costs.
But this is aluminized so it's gonna need to be a little bit more susceptible to rust,
but it's also going to be a little less expensive than some of the other options that you might
find.
You're gonna have all the parts and pieces that you're gonna need to get this installed
onto your 4-door JK, including all of the clamps that I don't have on the table here
today.
That includes your extension pipe, it's, of course, going to include your muffler, your
over axle and tailpipe.
So it is a very complete system.
This is all going to be two and a half inch piping which is the same diameter as your
factory piping.
All these bends are mandrel bend, which essentially means there's a piece that goes inside the
pipe as well as outside the pipe.
So when you're getting those bends made, you're not having any tinking of the pipes.
So you have a nice flow, you're not having any restrictive points.
And overall I do think it's a well-built system.
I've seen systems by a lot of those top-end brands, with bigger-name brands, much more
expensive systems that don't have as nice of welds on them as this system does.
So I do think it's a well put-together system and I think you're gonna get a lot for your
money here.
Speaking of money again, aluminized, non-stainless also doesn't have a polished tip.
It's not a black system that's ceramic coated.
None of that.
This is really more of a no-frills system.
And you are gonna be able to save a bit of money because of that.
So for the installation again we're gonna give it a one out of three wenches.
Very easy to bolt this up in less than two hours.
The first step is, of course, removing all of your factory exhaust components.
You'll start by removing the muffler off the back of the jeep.
And then the extension pipe that goes from the collector of the headers all the way back
to that muffler system.
That's really going to be that whole system there.
Everything is gonna come off from the collector on the headers all the way back.
You're going to be reusing all of your factory hanging points, all of your factory hangers.
These are designed to go right onto those.
So there's no modification of the Jeep necessary, it will make things nice and easy.
And this does come with all of your clamps.
So if you have a factory system that's a little bit rusty, go ahead and get it out.
Then you Sawzall, cut it up and get it out there any way you can.
You're not gonna be reusing any of those clamps but again the hangers you do wanna leave intact.
That being said, your system is not overly rusty, hitting it with a good penetrating
oil well before you get started with the installation is definitely going to help speed the install
along.
Once all of that stuff is removed, you'll go ahead and install your new system.
You're going to have your extension pipe on your 4-door, followed by your muffler.
Then you're going to have this next tailpipe piece here.
And finally your over-axle and your exit that's going to go in place.
You'll start from the front, working your way to the back leaving all of your clamps
loose at first.
Then you'll go back through the system again starting at the front and tighten everything
down to ensure that everything is lined up exactly how you like it.
This system comes in right around $260, which I do think is gonna be a really good deal
for what you're getting here.
If you step up to one of those bigger brand names, you are going to pay a little more
just for the name.
And then their systems are also going to be available in high grades of stainless steel,
which are going to all add cost.
They're going to have polished tips, we're gonna to be getting into systems that are
offered in a black ceramic coating.
All these things add cost.
This is going to be a little bit more of a bare-bones, no-frills system that's still
going to work very well, install very easily and get the job done, but save you some money.
So if you're looking for a less expensive cat-back system on your JK that's still going
to relocate the muffler, give you less stuff to crush when you're off-road, I definitely
recommend taking a look at this system from MBRP and you can find it right here at extremeterrain.com
-------------------------------------------
About 40,000 still without power - Duration: 0:27.
-------------------------------------------
How To Hard reset iPhone 6 , 7 , 8 ISO 11 Device - factory reset iphone - DEAR HOW TO HD - Duration: 4:53.
how to Hard Reset Iphone Device iso 11 ... hey guys it's Jeff and today we are gonna talk about hard resetting your
iDevice with iOS 11 came a feature called emergency SOS and that
configuration has kind of screwed up the hard reset feature for most iPhones now
typically when you wanted to hard reset or put your phone into a DFU mode you'd
click the you'd hold the power button and the home button and that was kind of
taken away when the home button didn't actually contain any physical buttons
anymore so when you hold that button when it's when your phone is off you
can't feel anything the taptic feedback is completely gone so with the iPhone 7
and 7 plus and now the 8 and 8 plus the method was holding the power button and
the lower volume button until the reset feature or the hard reset would kind of
activate and you'd hold that until you saw the Apple logo your screen would go
black and then you'd see the Apple logo and you release those two buttons you'd
continuously hold one of them to get into DFU mode but that's besides the
point we'll get into that one later if I held that any longer the emergency SOS
feature would start you know making very loud noises so I don't want to do that
but basically it would have a countdown and once it reaches zero it would
contact emergency services AKA 9-1-1 or the number for emergencies services in
whichever country you are in so now in iOS 11 there's a completely new method
it's actually quite easy and it uses all of the available physical buttons so
it's quite easy to remember now first things first if you want to get into a
DFU mode you are going to want to have this lightning connector plugged into
your device and the USB end plugged into your computer now the only reason you
use this method to get into a DFU mode is if your phone is unresponsive and
it's not being it's not being seen by your computer so
you'd want to get into that DFU mode to get it readable by your device most
people will be using the hard reset method which is basically if your phone
is lagging or it's crashed or you just want to hard reset your device mostly
that's going to be used because I've run into that issue quite a bit now in iOS
11 where some things crash and I just have to get to a reset because it's
lagging too much so the method is actually quite easy you're gonna be
using the the top volume control button the lower volume control button and the
power button so you're gonna do a quick press on the top quick press on the
bottom and then a long hold on the power button so I'm gonna demonstrate that for
you now and we're gonna do top press lower press and hold the power button
and you're gonna want to release that power button when you see the Apple logo
it'll take quite a few seconds here to get back to the Apple logo but as it
pops up will release that home button and the hard reset will be completed and
it should go back to your home screen so it'll kind of go throughout the process
here of getting back to that home screen and resetting and there we go
so if you want to put your phone into a DFU mode as I said you need your cable
plugged into your device and then into a computer if you want to do that all you
have to do when that that Apple logo comes back up is since you quick press
these two options you're not going to be holding them you're only gonna be
holding the power so when that USB is plugged in you want to continuously hold
the power until DFU mode is activated so guys that's a quick tutorial on how to
get into a DFU mode or do a hard reset on your iDevice in iOS 11 I thank you
guys so much for watching if this was helpful please send us a like share with
your friends who might be interested and definitely get subscribed for some more
upcoming content and tutorials like these again thank you guys so much for
watching stay tuned and I'll catch you guys in the next one
you
-------------------------------------------
Anderson | "Paul Scholes is one of the greatest!" | Manchester United teammates - Duration: 3:53.
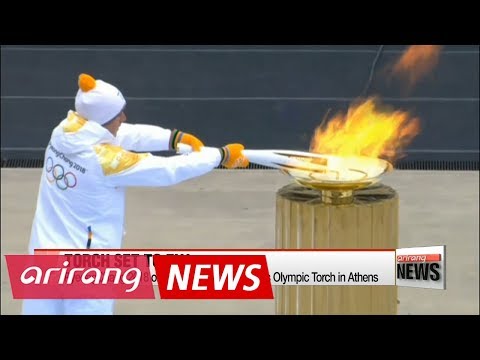
-------------------------------------------
Olympic Torch handed over to PyeongChang 2018 - Duration: 1:49.
-------------------------------------------
Pres. Moon calls N. Korea's participation in 2018 Olympics the start of Peninsula's peace and ... - Duration: 2:35.
-------------------------------------------
Ekattor Tv News 31 Octobor 2017 Bangladesh latest News Today Bangla Breaking News BD News all Bangla - Duration: 17:12.
Ekattor Tv News 31 Octobor 2017 Bangladesh latest News Today Bangla Breaking News BD News all Bangla.
-------------------------------------------
Digital Art | Mirror Effect in Photoshop | Photoshop Tutorial | click3d - Duration: 4:15.
document 1920p* 1080p, resolution 300px
color #c8c8c8
fill
drop this image in your document
rename as "lady"
now add new adjustment layer "black & white"
levels
now group all the layers except "bg" layer
rename as "work"
now duplicate the group
merge the group
rename the layer as "final"
now duplicate the "final" layer
and rename it as "scale"
now drop this circle/ring shape in your document
you can find this in the "Download files" in the description
now get the selection of "circles" layer (ctrl + click on layer thumbnail) and turn off the layer
now select "scale" layer and add layer mask
now unlink the layer mask from the layer as shown
select layer thumbnail and apply free transform tool
scale
now turn on the circle layer
drop the opacity to 5%
now take a new layer above
rename it as "overlay"
fill it with 50% grey
add noise
add gaussian blur
blending mode "linear light"
now add new adjustment layer "gradient map"
color #070423 - white
adjust opacity
now press (ctrl + shift + alt + e)
blending mode "linear light"
filter - other - high pass
we are done
-------------------------------------------
DITES ADIEU AUX GRAINS DE BEAUTÉ, VERRUES ET TACHES DE ROUSSEURS GRÂCE À CES RECETTES NATURELLES - Duration: 4:45.
-------------------------------------------
National Assembly wraps up audit of government agencies on Tuesday - Duration: 2:28.
-------------------------------------------
10 symptoms of cancer that many ignore | Sign and symptoms of cancer - Duration: 6:02.
-------------------------------------------
English Ninjas - Future Perfect Tense - Duration: 4:08.
Hi, this is Margaret from English Ninjas. Today I want to talk about the future perfect tense.
This one is a little bit more difficult than the past of tenses we've talked about. However, it's pretty simple. Once you get the idea of it down.
So, what is the future perfect tense use to describe?
It is used for something that started in the past, but will end in the future.
So, if you're talking on a timeline...
...the events started here you are here and the event will finish here...
It's a little difficult to get your head wrapped around, so let's move into the structure.
Structure always begins with the subject! (I, you, he/she/it, we, you, they)
Next, always the same for all subjects "will have"
I will have - you will have - he/she/it will have - we will have - you will have and they will have...
Not so bad right?
Since it's always the same, you don't have to worry about conjugating and you have two different verbs there...
(1) "will" - the future tense of to be. So that's what's taking the event here "will" tells you it will be in the future will equals the future because it's the future tense of to be.
Past senses (to be): "was & were" | Future tense: "will" so...
Next, you have the verb (2) but in the past participle. We talked a little about this before.
Where if the verb is regular, you just can keep the "-ed" How you make it past? Add the "-ed"
So, like dance... The past tense: danced or act turn to the past tense: acted.
Vanish... Past tense: vanished and then just the rest of it.
So an example of this would be, if I wanted to say next year...
I want to specify that next year, in the future... But something has already happened in the past that I have contributed. So...
I would say: Next year + I (subject) + will have (the verb) + traveled. (the past participle of travel)
"Next year I will have traveled" now I need the object I need the rest of the sentence because it's not totally complete.
So, next year I will have travelled to 20 countries.
That tells me at this moment I have not traveled to 20 countries, but next year I will.
Meaning I have some travel scheduled. It can be a little confusing and it's a little bit tough to get your mind wrapped around.
Another example of this if we're going to take an irregular verb. A good example of this is using the verb eat.
Because I love eating I'm always eating. So if you say: "order a pizza" and I say:
"Oh! If I order pizza and you are late, I will have eaten all of the pizza by the time you arrive."
So that tells me, you will arrive in the future... But in the present, I will have eaten all of the pizza by the time you arrive.
So I will eat now and when you arrive there will be no pizza. It will be gone!
So, if you have any questions about that, I know it's a little bit of a tough one, but feel free to ask us.
Any questions you have, we're always happy to help!
Have a great day!
-------------------------------------------
'It Was A Tremendous Day For Special Counsel Robert Mueller' | Morning Joe | MSNBC - Duration: 9:48.
-------------------------------------------
How To Remove Dark Spots From Face | Get 100% Spotless Skin In 3 Days - Remedies One - Duration: 3:38.
nobody likes scars on the face it is sometimes tricky to get rid of acne
scars but it is not impossible normal acne scars fade away just within
one month or two sometime due to some special reasons acne scars become more
dangerous it is possible to treat acne naturally today's video will discuss how
to get rid of red acne scars fast before you watch this video please take a
moment to subscribe our youtube channel by clicking the subscribe button then
tap the bell icon so you will be the first to know when we post new videos
daily you have to fight against your acne scars and natural ingredients will
help you to fight against acne scars in this condition
these regular custom-made cures will accommodate us safe as well as a
continuing prescription for skin break out scars to blur them you will be able
to discover fresh and clear skin if you maintain the process one egg whites egg
whites have influential mending qualities that will help recuperate your
scarring and in the end make it less obvious egg white is brimming with
proteins and amino acids which can tighten the pores to avert new breakouts
while it lightens the scarred skin how to use take a little Bowl as well as
with one egg whites until they get to be feathery in white utilize your fingers
to tenderly spread the egg whites onto your skin focus on the issue territories
let the egg whites dry on the skin and hold up a couple of minutes before
washing without an tenderly with respectably warm water do this two to
three times each week precautions if your skin is very dry you can use olive
oil after washing your face with warm water 2 baking soda baking soda is
basically course however not that coarse the particles of baking soda are very
smooth would not harm the skin how to use
simply blend a little measure of baking soda approximately one to two teaspoons
with water to make a reliable glue tenderly back rub the heating pop onto
your skin and abandon it on for one moment before washing it off with tepid
water precautions keep in mind to moisture your skin subsequently massage
three drops of olive oil all over your skin and it meets expectations extremely
well rehash this two to three times each week are relying upon your schedule 3
aloe vera new aloe vera gel is an intense wellspring of vitamins which can
help to mend skin and blur scars aloe is delicate so you won't need to stress
over further harming or bothering skin how to use simply sever a little bit of
one leaf peel away the external tissue to uncover the gel and back rub tenderly
into your skin for best comes about let the gel of the sword for no less than 30
minutes before washing your skin precautions
sometimes aloe vera causes irritation you need not to worry about that if it
is too much then you can wash your face immediately have you ever tried these
remedies to get rid of dark spots from acne let me know in our comment section
below if you liked this video give it a thumbs up and share with your friends
for more daily tips subscribe to our channel below thank you
Không có nhận xét nào:
Đăng nhận xét