Do you have trouble painting trees in oil I'm gonna show you the simplest and
easiest way if you're a beginner or novice or even just starting out with
your very very first painting in oils coming at you right now
Hey guys Wild coming at you from my creative control playlist bring you the
best tips, tricks, and even painting tutorials just like this if this your
first time here consider subscribing and hitting that Bell below so you know when
my videos go live one of the biggest questions I get asked all the time and
even more a request I get all the time is please show me how to do trees and to
be honest I think trees are one of the hardest things to do but I'm gonna show
you some simple tips and tricks to make them way way better now this tutorial is
just for beginners and novice I'm gonna do a series of these because I'm just
gonna do very very basic shapes and how to's for this one I figure I'll probably
do a very beginning level one and maybe level two and then level three but I'll
do two and three at a later point but I want to show you guys how simple you can
improve your trees rather than just doing a basic triangle shape or zigzag
motion so let's go over to our canvas and let's get started when learning to
do trees I think it's actually easier to do them on a black canvas when starting
out for the beginners that is and to achieve a black canvas we have to coat
this game is in black gesso if you're not sure how to do that
I'll put a link in the top right hand corner but basically grab whatever black
gesso you have I have a liquid text one I have a BA brass one you can even use
basic black acrylic from any art store and coat your entire canvas so make sure
you do that and we're gonna do that right now when your canvas is thoroughly
coated and gesso and make sure it dries usually takes anywhere from a couple of
minutes to about 10-15 but make sure it's completely dry we're gonna go and
throw a nice basic background in here and this is just to make our trees pop
out for when we actually put them on so I'm gonna cover my sensor with cadmium
yellow and blend it out with a two inch brush and then I'm gonna put a lizard
crimson on top of that and below it and then blend it out with a two inch brush
and then I'm gonna use a little bit of phthalo blue on top and on the bottom of
the alizarin crimson and just blend that out with the 2 inch brush so let's go
ahead and do that right now it may be hard to see but I do have all
of my background colors in here I've got my yellow my red and my blue is to pull
those color for just gonna take a 2 inch brush with a little bit of titanium
white on there and we're gonna just blend that in and work our way out from
our Center so we're outside all the way around and a nice spiral motion so let's
go ahead and do that really quick now that we have an easy and beautiful
background put in just like it's now our trees can start to pull forward on this
kind of little hazy nighttime scene here and all we're gonna use today is we're
just gonna use a basic black now if you're gonna use the bob ross paint that
black is a little creamier than this paint to make this slightly thinned down
while we're gonna use is just a couple of drops and I do mean a couple of drops
of linseed oil and what this is gonna do it's gonna break down the pain a little
bit to make it a little more pliable a lot of paints come out kind of firm and
thick and are hard to apply right away and to solve that problem all we need to
do is get our linseed oil and just mix it with this just a little bit so I'm
gonna do that really quick for you when you've got your paint to a nice
consistency here make sure you load up your fan brush with a lot of paint and I
do mean a lot of paint should come all the way up the bristles and it should be
fully loaded at all the corners now a lot of you probably get a paintbrush
that looks something a little more like this this is a number 6 fan brush and
it's a great fan brush but for beginners I find it way way way too hard to start
off doing trees it works fine when you've mastered it but what is very
difficult for most beginning painters is control so when you have this smaller
fan brush here you can actually have a little more control over your trees and
build out from there this is kind of a big boy and we'll cover this out another
episode at a later time so I recommend picking up one of these if you haven't
I'll put a link in the description below so that we guys can see where you can
buy it on Amazon or at a craft store there for the best price but use this
fan brush when you start off paying your trees you have to designate where
they're gonna be an easiest way to do that is by
designating a trunk line to do that just use the chisel edge of your fan brush
here and kind of just start tapping in and down so you get a generalize idea of
where your chumps gonna be now I've already used a little bit of my paint I
know it doesn't seem like much but it's easier to just go ahead and reload your
paint brush by wiping it through the paint and pushing all that paint
wiggling it through it's at the end of the paint brush that really quick with
our paint brush all reloaded up we've got a nice chiseled edge and we're just
gonna paint with the corners of our fan brush here so come straight at it and
turn the handle dramatically to the right and tilt it down a little bit or
you can do it to the left if you're left-handed it's the same technique
don't worry about it and we're just gonna start tapping in now a lot of
times you'll still you'll see people do a Z motion which is generally the ID of
what you want but it's more of like you come down into a Z and then come back to
the center and then come down and come back to the center and come down and
come back to the center and come down that's actually an easier way to do it
hard to master but try working on that rather than zigzagging down when he
zigzag down you don't get a lot of bushes and branches that kind of bend in
the crud the correct way so we're gonna hook here and all we're gonna do is just
tap our first little branch in and there it is we're gonna go over to the left
and tap down and tap tap tap tap tap tap tap tap
and just keep working it out and as you come down you just push a little harder
and you slowly start working your way down and out and this is a little bit of
a distant tree so don't worry about too much of the shape and form here and just
keep pressing and as you press it down you start creating all these thousands
limbs and branches and leaves that are just sitting back there and if you start
to lose consistency or paint in your brush just go ahead and flip it over and
use the other side and just move up a little bit and do the same thing and
just push down and push a little bit harder to get a few more leaves to come
out of there and you can go wider and wider and there you've got a basic green
don't be afraid to come back up here and finish some things if you need to or
shape some branches it's that simple and there you've got the start to a very
basic easy tree you can come at it and attack it right down and center and it
goes straight up from the first one third and just give it a nice little
point right there so that way people know it's got a nice little tree that's
growing up straight and that's it that's the simplest form of doing it you can do
a zigzag motion if you'd like to but I prefer going down and out and then down
and out and then down and out back at you a little more shape but each tree
means a little friend here so I'm gonna flip the camera over I'm gonna shoot
from my actual side of how it actually is being applied so one moment we're
gonna flip the camera so let me show you what I did with my paintbrush as it's
actually coming off the paintbrush onto the canvas you get a better idea of how
applying paint I use the same technique I lay down a trunk line so that way I
know where my branches can stem out from and I go in the down and out motion and
apply my color if I run out of any color I just flipped the brush over and start
continuing to paint with the other corner don't be afraid to clean up your
branches as you come across your tree as well
now that you have a basic understanding of trees you can apply it to a bunch of
trees over and over and I recommend practicing a few different trees which
I'll show you right here just remember not all trees have to be the same
symmetrical shape there are trees that hang more to the left more to the right
some don't grow up that high some more bent over some have branches that are
full some have branches that are thin and some are just barren so make sure
you keep that in mind as you doing a bunch of different trees because that's
what adds a lot of character and depth in your painting when you have more time
go as fast or as slow or as detailed as you want so now that I have a little
more time and I'm closer to the canvas I can actually just take my time and go
right through it so it's gonna tap in right there and tap down and
it's as simple as that you can that way you can have some basic easy fun trees
and this is just the very very basics of doing trees now that you have an awesome
grasp on how to make the shape of trees I'm gonna show how to put highlights on
trees so I'm gonna pull this little tree forward and add a little thicker base so
I can show you how to apply some simple highlights on here to make the tree
stand out even more if you have it I recommend using liquid white or magic
white to apply on highlights on top of your canvas but if you don't have that
you can use a titanium white with just a few drops of linseed oil make sure it's
a little bit thinner than what we put on here so that way our thin paint will
stick to our thicker paint so that's the golden rule always remember that with
our fan brush all loaded here with a nice liquid white or magic white or
anything down white that you have we're just gonna come in here and concentrate
so this tree that I added a little more branch to and this tree here the only
ones I'm going to concentrate on at the moment but it's the same process all you
do is come straight at it turn it and tilt it down and you only want to do
every so other branch and take into consideration where your light sources
are coming from because that's where your highlights should be but for the
sake of this tutorial it's more about just applying it on there and getting
the idea now if you notice I didn't go over trunks at all for beginners I'm not
gonna do trunks and my next video that I'll do for a tutorial on trees I'll
show you how to cover up trunks and put in trunks but for basics right now we're
just gonna assume that these are silhouetted from behind we're gonna come
straight at it turn it and dip your hand a little bit and just start tapping in
ever so slightly and I recommend going very slow for highlights
now with whatever parts you don't like or some spots that may have some blobs
on them like here I didn't really get a good application I always like to go
back with a nice clean fan brush here make sure you wipe off all the excess
color from the fan that way you've got it nice and clean here and dab just
right at the bottom here and fade it down into that black just so ever so
slightly and what this does does this cleans up a lot of the edge and it looks
like some of these highlights are actually crashing and striking through
some of these branches and thousands of leaves here and feel free to tap out
your and feel free to tap out that extra color here on a loose paper towel
because at some times it will get muddy but it's okay if it actually dissipates
into a little bit of a gray color here because that would naturally happen in
in life these colors would mix and blend
to give you a better idea of how I tap out the highlights and make it look like
it's fading down into the leaves and the branches I went ahead and flip the
camera over here for you so you can see how a light and delicate touch it is and
all I'm using is the corner of my paintbrush well I hope this all gets you
very excited out there to attempt trees they're not as hard as they look but I
still think they're one of the hardest things to do so the biggest tip I can
give you is go slow and work at your own pace that works best for you and always
remember that a thin pane will always stick to a thin paint for your
highlights now just for fun I'm gonna put in a giant big tree with that giant
fan brush here and take a little more time so you can show the general shape
and just review what we've done so always remember to throw in your trunk
line and start working out from the top down and work in kind of a down and out
motion and you can throw in a few sig sags to fill in the body and always
remember you don't always have to fill in your tree you can leave gaps if you
want if you run out of paint don't be afraid to reload your paintbrush or
better yet you can flip over your paintbrush and start using the other
corner as you get down towards the middle and even further beyond and the
tree feel free to push a little bit harder that's what pushes out all those
branches and leaves there and when you want to apply highlights make sure you
take your time and work on every other branch don't feel like you have to cover
the entire tree and highlights or snow wow that was a bigger tutorial than I
thought it was gonna be guys but just reminder that's just a novice slash
beginner one for you guys out there trying to start your wet on wet painting
technique and wanting to enhance your trees trees I think are very hard just
go very slow and try it I'll do a level two and a level three so that we can see
how highlights apply better getting better shape fuller branches different
style of trees birch different Barb's trunks things like that but a lot of you
been asking for requests for me to do it and I've been putting it off because
I've been so busy but this is just level one will be level two and level three at
another point if you guys liked this video make sure you give it a nice
thumbs up and help me grow by leaving a comment
below let me know in any way that I can help you grow or show you another
tutorial or anything that you need to figure out how to do in painting and
beyond so thank you guys for watching once again my name is wild feel free to
follow me follow me on my social media on Instagram and Twitter and I will see
you guys on the next painting tutorial next time take care and happy painting
peace

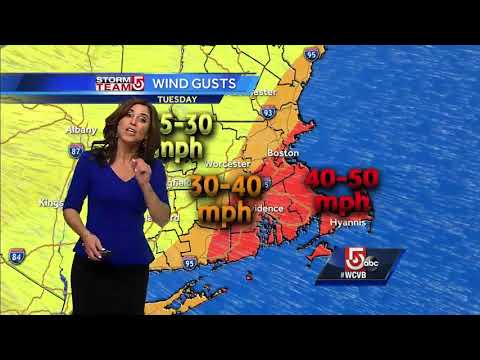 For more infomation >> Video: Heavy rain, winds on Tuesday - Duration: 3:44.
 For more infomation >> Cook's Corner: Veal strip loin - Duration: 3:05.
  For more infomation >> Meet The Winners Of The Next TODAY Wedding John Cena Will Be Officiating | TODAY - Duration: 7:01.


 For more infomation >> Marjorie de Sousa rompe en llanto mientras habla de Matías | Suelta La Sopa | Entretenimiento - Duration: 7:25.
  For more infomation >> Concursantes de MasterChef Latino en exclusiva con SLS VIP | Suelta La Sopa | Entretenimiento - Duration: 3:07.
  For more infomation >> Luis Miguel le fue infiel a Desiree Ortiz | Suelta La Sopa | Entretenimiento - Duration: 15:43.
  For more infomation >> Marjorie de Sousa en exclusiva sobre su hijo Matías | Suelta La Sopa | Entretenimiento - Duration: 5:31.
  For more infomation >> Con Mi Tia En La Picina Copa Caribe Nuevo Vídeo Vlog - Duration: 10:10.
  For more infomation >> Mujer se opera nueve veces para parecerse a Melania Trump | Suelta La Sopa | Entretenimiento - Duration: 8:04.
  For more infomation >> 먹다 남은 콜라의 놀라운 용도 11가지 - Duration: 10:11.
Không có nhận xét nào:
Đăng nhận xét